Series Land Rovers
FLIPFRONT
by Mike McDermott
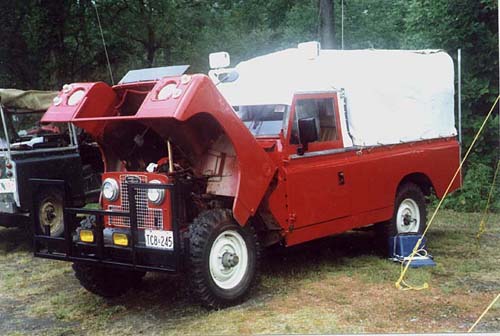
Fed up with lying in the mud trying to get the oil filter off? Getting tired hanging by your toes from the fender struggling with the starter? Worried about adjusting your master cylinders but you just can't face removing the fenders...again? There IS a better way. A weekend's work can give you a neat system where the entire front body of the Land Rover swings out of the way to reveal unhindered access to all those nasty little bits that have been hiding away for years.
The approach is simple...mount the rad separately to the frame, bolt the bonnet, fenders and grille panel together and use the existing bonnet hinges to swing the whole assembly up and out of the way. For really severe engine work, you simply unplug the electrics to the front and slide the entire assembly off the hinges...takes 10 seconds. The system has been used for years on large commercial vehicles, sports cars and competition machines...things that require a lot of maintenance.. like most Land Rovers.
 Harry Bligh's 109 pick-up exhibiting the modification.
First thing to do is stand around and think a little. What's going to have to come off the front body work to make the plan a success? The bottle for the windshield washer has to go, or it'll be a wet head for the first person who lifts the new assembly.
And you can't mount your spare on the bonnet anymore--unless you're an Olympic weight lifter. That done, take out a piece of chalk and scribe some marks on several places for later references...like where the rad meets the front cross member, where the grille panel meets the rad and the frames. Then take everything off...bonnet, fenders, grille panel and rad.
On Series II and later you'll have to rework the sill panels under the fenders a little. If left stock, the fender will bind as it moves up and down. Best to cut the sill flush with the bulkhead and fasten the front part directly to the bottom of the fender. Members who use their LR in the rough a lot often remove the sills completely because they're strictly a cosmetic item and susceptible to bashing from the high ground.
Next, take two lengths of 1/16 angle iron, 1-1/2 wide by 20 inches long and match them to the mounting holes on the rad frame, where it was bolted to the grille panel. Ensure the top of the iron is flush with the top of the rad frame. Drill 1/4 - inch holes and countersink them from the outside. Then bolt the iron to the rad frame using countersunk screws so the surface between the grille panel and the angle iron is flush.
That done, place the rad with the angle iron attached where it sat originally on the front cross member. Remember to check your scribe marks and ensure the rad is centered, straight and level. Tack weld the iron up-rights where they meet the rear of the front cross member and put the grille panel back in place to see if everything is where it's supposed to be.
Remove the rad and complete welding the iron up-rights into position. Then, run a 3/4-inch piece of angle iron from the top of the rad support on the driver's side to the bulkhead support above the steering box to provide stability. A rod to support the assembly in the open position is also fastened to the top of the rad support and contacts the bonnet. In the closed position it can be tucked into a bracket on the dash bulkhead.
Bolt the fenders, bonnet and grille together and slip the assembly into place on the bonnet hinges. Late models with plastic inserts in the hinges may have to be reinforced to carry the added weight. If you did everything right, the assembly should drop right into place, the grille panel fitting into position flush against the rad supports.
Tapered brass pins in the rear edge of the fenders where the bolts used to go will help the fenders find their rightful home in the bulkhead. You can make your own from brass, 5/16 bolts. Grind a one-inch bolt to a taper, leaving a few threads near the head on which to put a "thinned" nut to secure it to the fender.
Aluminum fender inserts mounted between the inner and outer fenders help guide the pins home and keep wheel spit around the heater motor, clutch and brake master cylinders to a minimum. Existing splash guards may have to be removed because they would hamper the assembly movement. The whole thing is held at the front with heavy-duty latches fastened to the bottom of the grille panel and the front cross-member. Place a thin bumper material between the cross member and the bottom of the grille panel to prevent wear and allow "spring" for the latches.
Multi-contact plugs can be used to connect the lights and other electrics and make it fast and easy when you want to take the whole assembly off. Total cost is under $20 for the steel and aluminum. Added weight of the fenders and grille on the hinges is about 45 pounds. And all the work will make sense the first time you have to change a starter in January.
Further phtographs of this conversion can be found HERE


