Series Land Rovers
Gearbox Renovation
By Bill Maloney
***Francisco Silva - please try emailing me again. I was not able to reply to your question and do not have a working email address for you - Bill"""

Gearbox renovation isn't too bad if you've got time and patience. The tips I've learned that I can think of off hand are:
Remove the unit in sections - Overdrive, transfer + Hi-Lo unit together, then main box. This way you don't need a hoist (I'm 140 lbs and I could do it) and it makes lining up the pilot shaft a lot easier on reassembly.
Special tools- 19/32 socket, open end and box end wrenches, the heaviest duty set of snap ring pliers you can buy (for the snap ring on the output shaft in the transfer, and a torch - propane is OK - to heat the main box casing to remove the reverse idler shaft if necessary and to warm the transfer to remove the bearing races.
The first race (I've forgotten if it's front or back) in the transfer that you have to remove is difficult to get out. I heated the box and tapped it out on an angle with an old screwdriver from the inside. I think you are in England so parts should be cheap, but when replacing the mainshaft rear bearing get a double sealed unit from a transmission shop, use some good gasket sealer around the outside, and the oil won't leak from the main box to the transfer again.
The plain circlip on the front of the mainshaft is tricky, but be patient, use 2 or 3 screwdrivers to bend it out and you'll get it off. DON'T reuse it.
If the rear bearing race for the layshaft does not cooperate and there is no hole behind it, drill a new hole to allow you to drift the race out. Be sure the hole is in the gasket area. If not, the oil will leak right out. You'll understand better when you look at the area from the back.
While you've got it out, drill and tap the top cover of the main, transfer, and overdrive, install small hose nipples, and plumb some heat and oil resistant tubing up to the firewall (see the photo above). This will reduce the pressure and leaks as the box heats up and will reduce the amount of oil on you rear window.
Assemble the hi-lo unit to the transfer BEFORE bolting the transfer to the main box.
When replacing the pilot bushing, first try hooking the head of a nail under the front of the bushing in the flywheel, clamping vice grip pliers on the nail, then levering against the vice grips with the screwdriver. If this gets you nowhere put a grinding bit on your electric twist drill and grind out one side of the inside of the bushing. Don't go too far. When you're almost through tap it on an angle to try to turn it with a drift or chisel (careful of the flywheel). It should be loose enough at this point to pry/pull out. Soak the new bushing in ATF overnight before installing.
Output shaft bearing adjustment - the manual says to wrap a cord around the output shaft and pull with a scale, and using a feeler gauge between the casing and speedo housing. Bull$3!+ on that! With bearings well oiled bolt the speedo housing down with one of the .010 shims removed (you'll find 3 sizes of shims in there - .015, .010, and .005. You shouldn't have to buy any). Continue to rotate the shaft while tightening. If the shaft grabs before you finish tightening the bolts STOP. Unbolt the speedo housing, add an .005 shim (or remove the .010 and add an .015) and try again. If the shaft does not grab continue removing .005 at a time (mix and match shims to do so) until it grabs and STOP. Undo everything, add .005 and replace the speedo housing for good (don't forget the speedo drive thing that goes inside - it's like a doughnut with diagonal threads on the outside. Yes, it does have a name but I don't recall what it is. Make sure it's the right way around). I tried the rope around the shaft trick with the fish scale on my first rebuild (done 3 now) and found the value is either too low or it grabs.
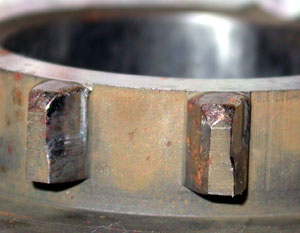 |
These are the engagement dog teeth |
| |
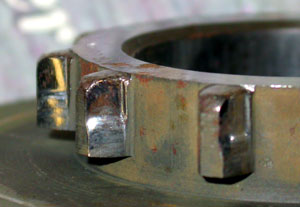 |
They should NOT look like this! |
The jumping out of gear problem could be weak or stuck detent springs or it could be that the engagement teeth on the affected gears are worn. The photos at the right are of the second gear engagement dog teeth on my IIA. It would jump out of second during overrun. It was very disconcerting to have this happen when going down a steep hill with 2nd low engaged. Even holding the gearshift in place it wanted to yank it out of my hand when I'd hit any kind of bump.
As for gears, if they look a little worn, replace 'em. Bearings, replace 'em. Sorry this stuff is not in order. From what you wrote I don't think you'll have any problem. It's not brain surgery, believe me. I think you'll find it very satisfying. Once you get it back together it may be noisier than before, but only for a couple of hundred miles or so once the gear teeth mate up. If you run into any snags feel free to write me. Good Luck!
Bill Maloney billREMOVETHIS@williammaloney.com


